Avicenna’s Notifications functionality allows you to create and send customized notifications, whether automated or manually, to the researchers in your team or the participants. Before sending a notification, you need to specify the recipients, set the notification trigger, define when the notification should be sent, and set a few other settings. All of these are combined into a notification template, which Avicenna uses to send one or more notifications. In this article, we will explore this functionality in depth.
Currently, Avicenna supports the following types of notifications:
- Participation Notifications: These notifications are related to the study’s participation events. At the moment, they can be configured to be sent when a participant is invited to the study, or when they join the study.
- Activity Notifications: These notifications are related to the activities of your study. They are triggered when an activity session is released, completed, canceled, or expired.
- Appointment Notifications: These notifications are related to the appointments in your study. They can be sent when an appointment is scheduled, when it starts, or when it is canceled. See Appointments for more details.
- Data Gap Notifications: These notifications are sent when Avicenna detects a gap or a non-wear period in a supported sensor data stream.
Notification Templates
A notification template, as the name suggests, outlines when to send notifications, their content, recipients, and other configurations. In most scenarios, you’ll need a notification template to send any notification. The only exception is sending one-off notifications.
Creating Notification Templates
There are two ways to create a notification template. First, you can go to the Notifications page on your researcher dashboard and click on the Notification Templates tab. There, you can create, edit, and delete the notification templates in your study.
Alternatively, you can go to the Activities page, choose an activity, and then click on the Notification Templates tab. There, you can create, edit, link, and unlink only the notification templates related to the current activity. This makes it simpler for you to configure notifications when you are creating your activity.
[!note]
Notification templates created on the Activity Editor can be used for activity-related events only. This means that you cannot use them for participation-related events. This may limit your options when choosing what should trigger the notification. On the other hand, you can use the Notifications page to create a notification template for both types of events.
Using the Notifications Page
Navigate to the Notifications page on your dashboard and select the Notification Templates tab. Here you can create and manage all the notification templates of your study:
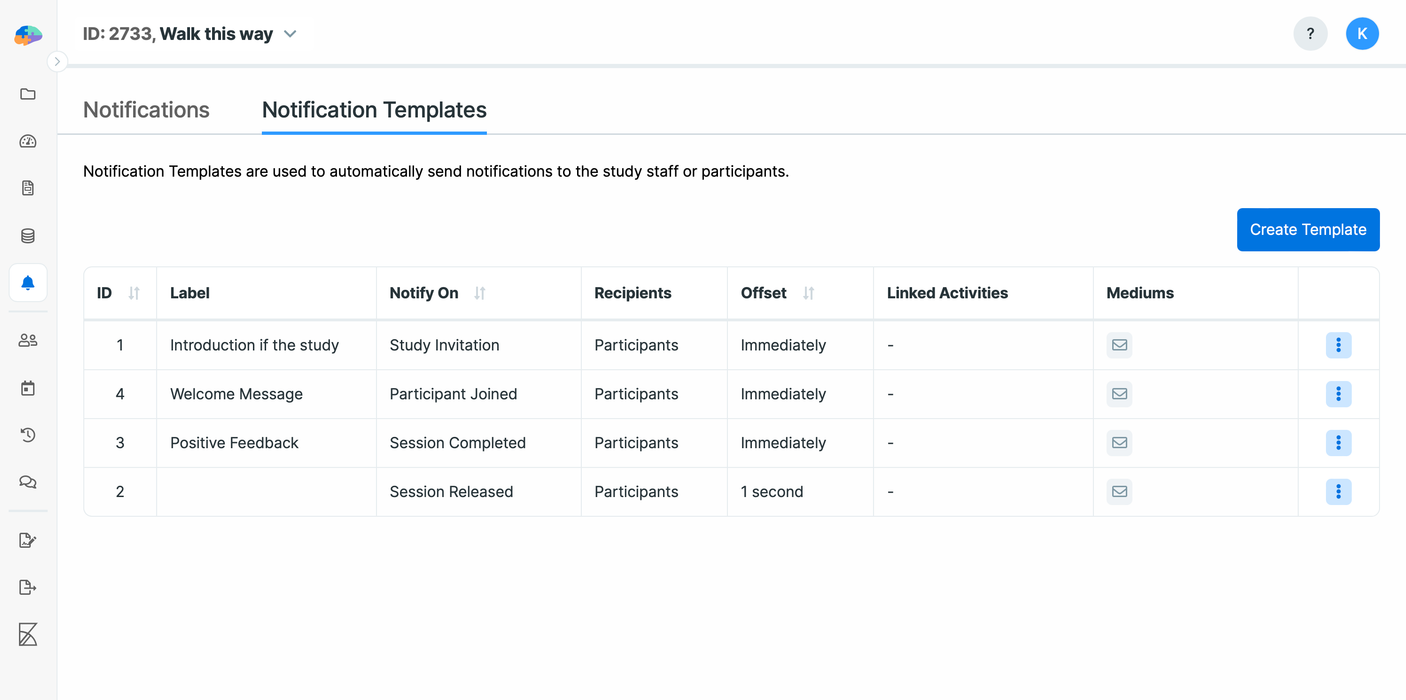
Clicking on the Create Template button shows you a dialog similar to the following. This dialog contains the parameters needed to create a notification template:
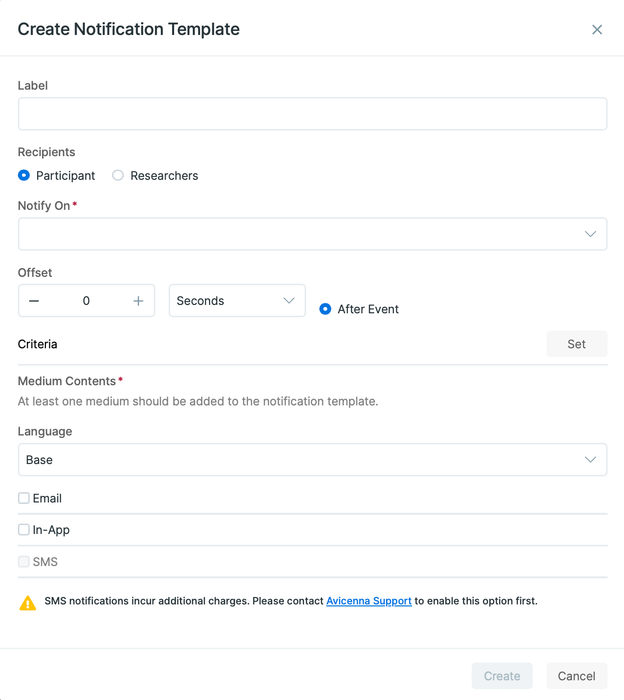
We explain each parameter in depth below.
Label:
You can assign a label to each template. The labels are only used to better identify the templates on the list.
Recipients:
You can specify who will receive the notifications. The recipients can be either participants or researchers. If you choose the Participant, the notification will be sent to the relevant participant. If you choose the Researchers, you will need to specify the researchers.
Notify On:
Here, you need to set what will trigger the notification. The available options include:
-
Study Invitation: This template will be used when you invite a new participant to the study. If you have not defined a Study Invitation notification template for your study when inviting participants, Avicenna creates one by default. Note that this notification can only be sent via email. That’s because, at the time of inviting a participant to your study, the email address is the only information Avicenna has from the invited participants.
[!info]
While all email notifications require participants to verify their email addresses first, Study Invitation templates are an exception. Here, we assume the participant’s email address entered by the researcher is a valid address.[!note] Localizing Study Invitations
The language detection algorithm relies on the language the participant chose in the app or set on their device. Someone you are inviting has neither yet, so they fall back to Base and the invitation is sent using the template’s default content, no matter how many translations the template has.To send an invitation in a specific language, set that language with the optional
languagecolumn when you invite participants. -
Participant Joined: The template is used when a new participant enrolls in the study. This can be used to either send a welcome email to the participants or to send a notification to the research staff and let them know that a new participant has joined the study. Similar to Study Invitation, Participant Joined notifications can only be sent through email.
-
Session Released: The template is used when a new activity session is prompted to a participant.
-
Session Completed: The template is used when the prompted session is completed. For example, in the case of survey activities, a survey session is completed when the participant responds to all of the questions and submits the answers.
-
Session Expired: The template is used when the prompted session expires. If a participant does not complete the session within the allowed time window, the session will be considered an Expired Session.
-
Session Canceled: The template is used when the prompted session is canceled. A session is marked as canceled when a participant explicitly indicates that they do not want to continue responding to a given session from a given activity.
-
Appointment Scheduled: The template is used when a participant books an appointment. See Appointments for how to set up appointment types and booking links.
-
Appointment Started: The template is used at the start time of a booked appointment. Combined with a negative offset, this is how you send a reminder before an appointment begins.
-
Appointment Canceled: The template is used when a booked appointment is canceled. The reason entered when canceling is included in the notification sent to the participant.
-
Sensor Data Gap Detected: This template is used when Avicenna detects a gap or non-wear period in a supported sensor data stream. Currently, this is limited to the Garmin Health SDK Logged Wrist Status data source. When you choose this option, Avicenna periodically (every 15 minutes) checks each participant’s wrist-status stream and triggers notifications if:
- no new wrist-status records have been received for at least the configured number of hours, or
- the records for that period continuously indicate that the watch is not worn.
When you select Sensor Data Gap Detected, additional fields will appear:
- Data Source: You must choose a data source that is already added to your study.
- Threshold Duration (hours): The minimum number of continuous hours with no new data, or with continuous “not worn” status, before Avicenna considers this a data gap. This must be a positive integer (default is 1 hour).
- Minimum Gap Between Notifications (hours): The minimum number of hours Avicenna waits before sending another notification from the same template to the same participant for another gap. This must be an integer between 1 and 24 (default is 4 hours).
[!note]
Unlike other events, the Offset for Sensor Data Gap Detected notifications cannot be changed. As soon as Avicenna detects that the configured conditions are met, it schedules the notification to be sent immediately (subject to your criteria and the minimum-gap setting).You can configure Recipients, and Medium Contents with the following rules:
- If the recipients are participants, you can use Email, SMS, and In-App notifications.
- If the recipients are researchers, you can use Email and SMS.
[!note]
Criteria will be evaluated when the notification is scheduled and again when it is about to be sent. If the criteria evaluate tofalseat either time, the notification will not be sent.
Offset:
Offset allows you to set how long before or after the event the notification must be sent.
[!note]
OnlySession Released,Session Expired, andAppointment Startedevents can have negative offset values. This is because Avicenna can send notifications before an event only if it knows when the event will happen beforehand.
Criteria:
You can define criteria that, when met, will trigger the notification. Consider a mental health study where participants are required to fill out daily mood logs through the Avicenna application. You want to ensure that the participants are not experiencing severe emotional distress, and if they are, you want to provide additional resources or support promptly.
In this scenario, you can use criteria to monitor participants’ responses and send notifications based on their input. This way, you can customize your notifications and increase the compliance among your participants.
For more information on how to use criteria in Avicenna, check here.
Language:
This field is only available if your study has more than one language. Languages are added in the Localization table at the bottom of the Basics page, described under Adding Localization. It is a selector rather than a property of the template: a single notification template holds the default content plus a translated version for each of your study’s languages. Switch the selector to a language, write the content for that language, then switch back to Default for the content everyone else receives.
When Avicenna sends the notification, it picks the version matching the recipient’s language and falls back to the default content when there is no version for it. Always fill in the default content.
Medium Contents:
In this field, you can specify the mediums through which Avicenna should send the notifications. We currently support three mediums:
- Email: Recipients, whether participants or researchers, need to verify their email address before they can receive email notifications.
- SMS: Recipients need to verify their phone numbers to receive SMS notifications. Also, this will incur additional costs on your study, and may incur additional charges on the recipient as well. To enable this medium for your notifications, please contact Avicenna Support.
- In-App: Recipients should have the Avicenna app installed on their phone to get the In-App notifications. As the Avicenna app is only designed for participants, this notification medium is used for the study participants and cannot be used for the research staff.
For each of the selected mediums, you also need to write the content of the notification. For email, this will be the subject and the body of the email. For in-app, this will be a title and a description. For SMS, this will be the content of the message.
In case you want to inform the recipients about the ID and the name of the study or the activity they are participating in, you can use placeholders by clicking on the Add Placeholder drop-down menu on the top right of your text editor. For example, if you want to add the name of the study to the email body or description of your in-app notification, you can click on Add Placeholder and choose Study Name. This will add the placeholder to the body field. When the notification is sent, the placeholder will be replaced with the actual name of the study.
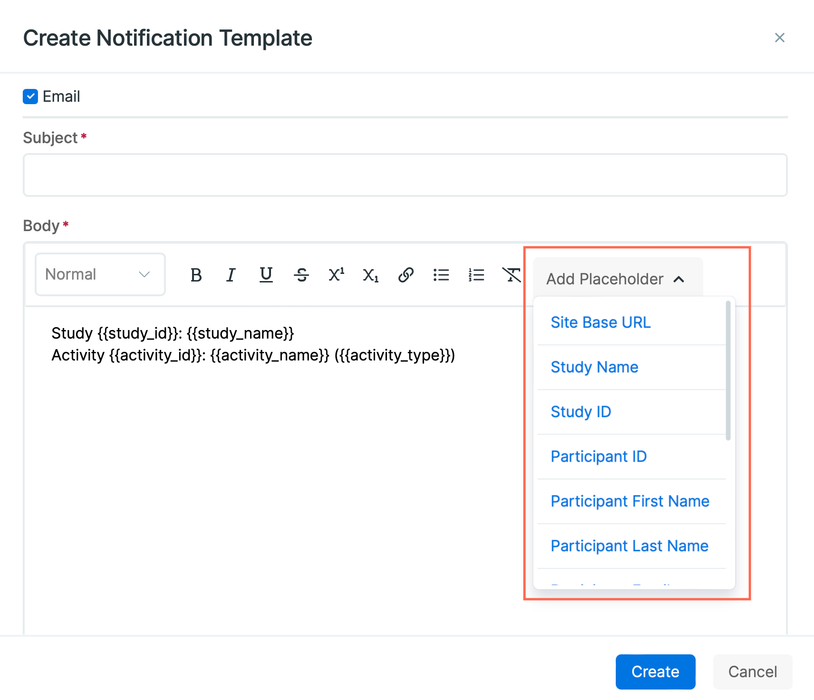
[!info]
Notify On options have different placeholders. For example, the Session URL and its placeholder are available forSession Released, but they will not work forParticipant Joined. The reason is that there is no session URL for a participant who has just joined, and using it here is meaningless.
In this case, you will see an error message that this placeholder is not supported.

To make it easier, Avicenna will provide you with pre-created placeholders for the body or description of your notification according to what you choose for the Notify On field. You can see how the placeholders may differ in the images below:
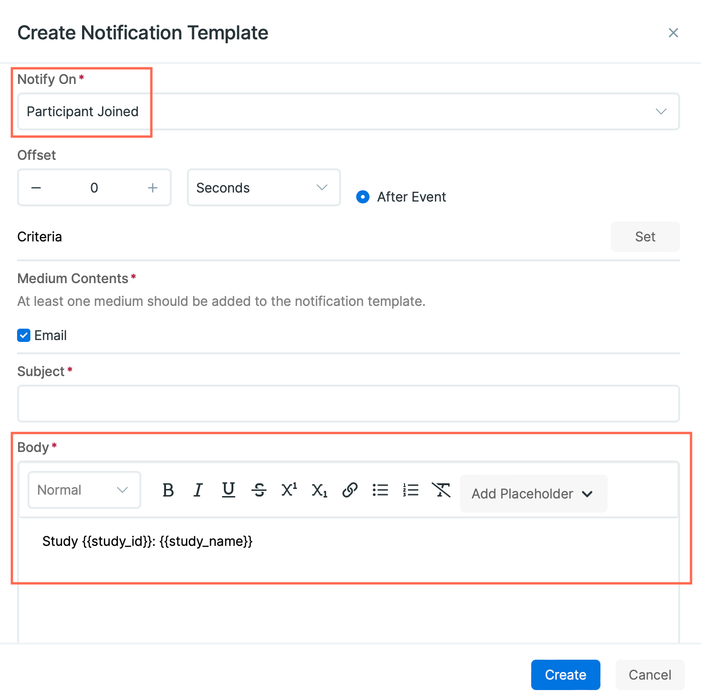
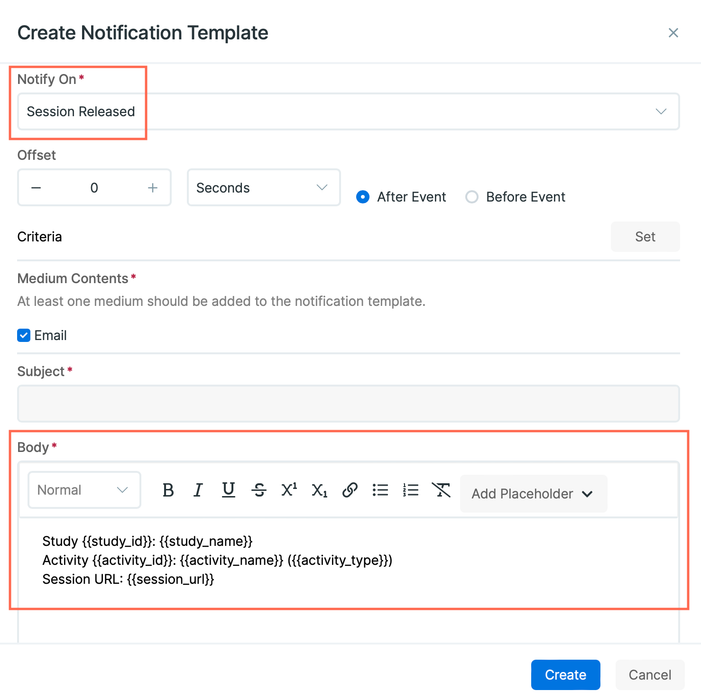
After taking care of the fields above, press Create, and your Notification Template will be created and immediately become active.
Using the Activity Editor
In the Activity Editor, you can create notification templates that belong to activity-related events (Session Released, Session Completed, Session Expired, and Session Canceled). To do this, after navigating to the Activity Editor, on the Notification Template page, click on the Create Template button at the top-right corner to create a new notification template. The process of creating a notification template here is similar to the one we already explained for the Notifications page. You should keep in mind that creating a template in the Activity Editor will immediately link it to the current activity. This will be explained in more detail in the next section.
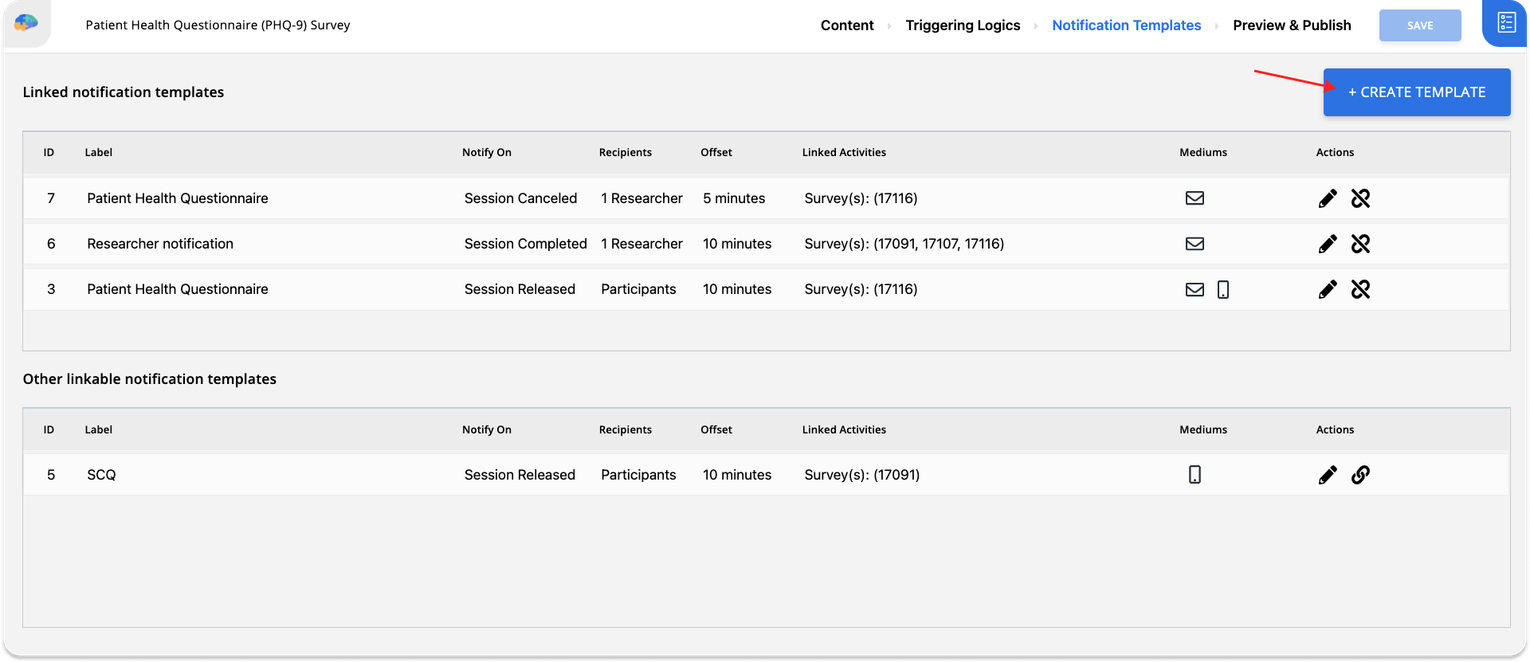
Linking and Unlinking Templates to Activities
By default, activities in Avicenna have no notifications linked to them. So the participants do not know whether they have a new activity unless they happen to open the Avicenna app at the right time. This is, of course, not ideal, and in almost all cases, you want to notify your participants to complete the activity.
To do so, you must create a notification template and then link that to your activity in your study. This can help you manage your notifications among different activities and avoid having identical notification templates.
To give you an example, let’s say that you have four surveys in your study. You want your participants to be notified whenever a new survey is released. In such a case, instead of making a Session Released notification template for each one of the surveys, you can simply create one notification template and link it to all the surveys in your study.
There are two ways to link a notification template to a given activity. First, if you create your notification template using the Activity Editor, the template will be linked to that activity by default.
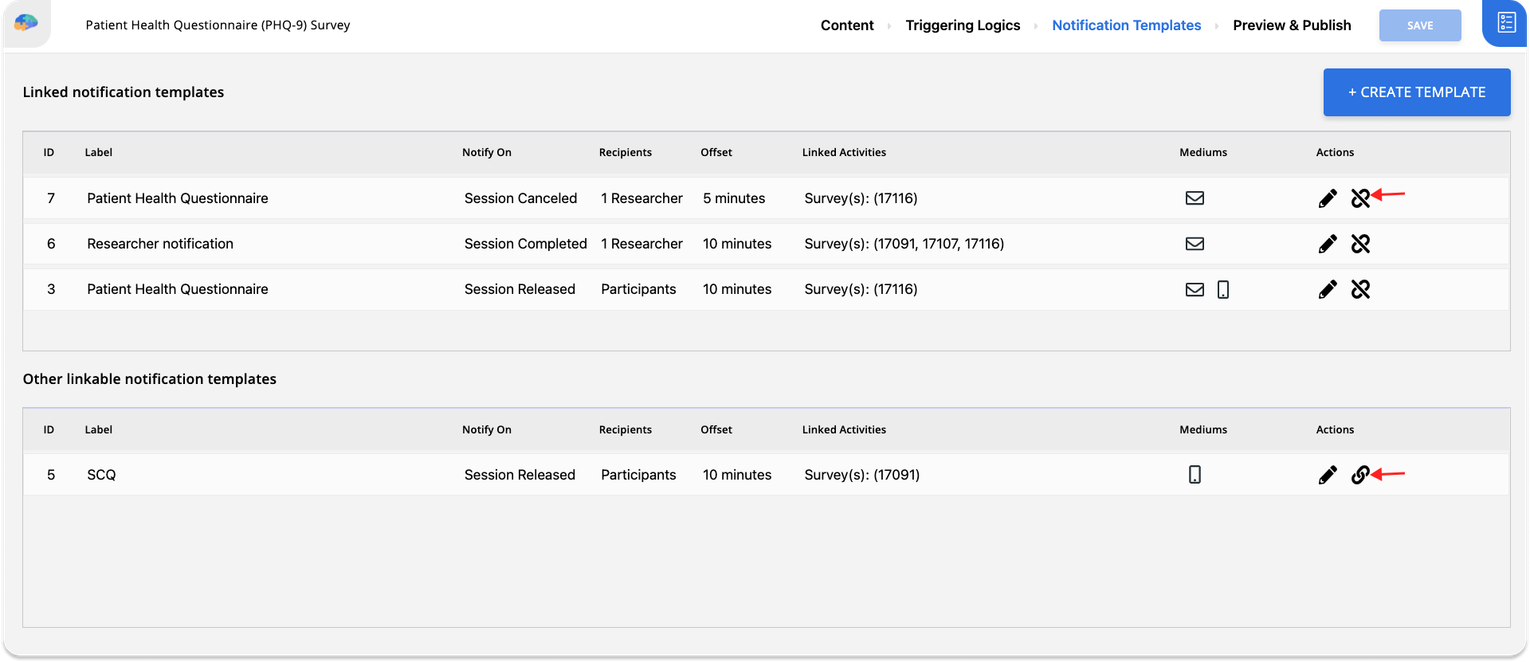
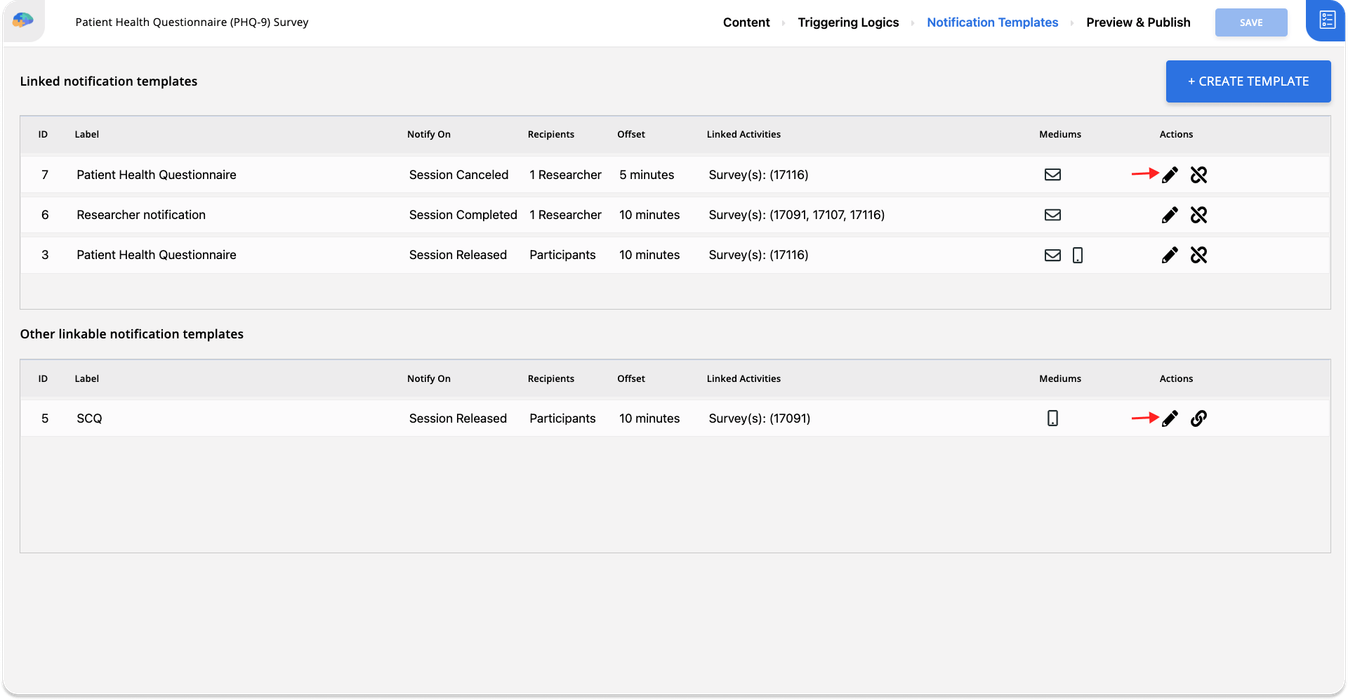
Alternatively, you can manually link an already-created notification template to an activity. In the Notification Templates page of the Activity Editor, you will see two tables: one for the templates already linked to the current activity, and another for potential templates that can be linked. By clicking the link button on each row of the second table, as shown in the above image, that particular notification template gets linked to your activity. Doing so will move the template to the first table. Similarly, you can unlink a notification template from your activity by clicking on the unlink icon.
Editing and Deleting Notification Templates
You can edit or delete the notification templates in your study as needed. While editing a notification template can be done on both the Notifications page and the Activity Editor, you can only delete notification templates on the Notifications page. This is because each notification template may be linked to multiple activities, and deleting it from the Activity Editor for one activity can accidentally modify other activities in your study.
The following table can further clarify what operations are accessible at what part of the researcher dashboard:
| Notifications page | Activity Editor | |
|---|---|---|
| Create a NT* | Possible | Possible |
| Edit a NT | Possible | Possible |
| Delete a NT | Possible | Not Possible |
| Link a NT | Not Possible | Possible |
* NT stands for Notification Templates.
To delete or edit a notification template on the Notifications page:
- Go to the Notifications page and choose the Notification Templates tab.
- Click on the 3-dot button that you see on the right side of the table.
- Choose the Edit or Delete options to initiate the related operation.
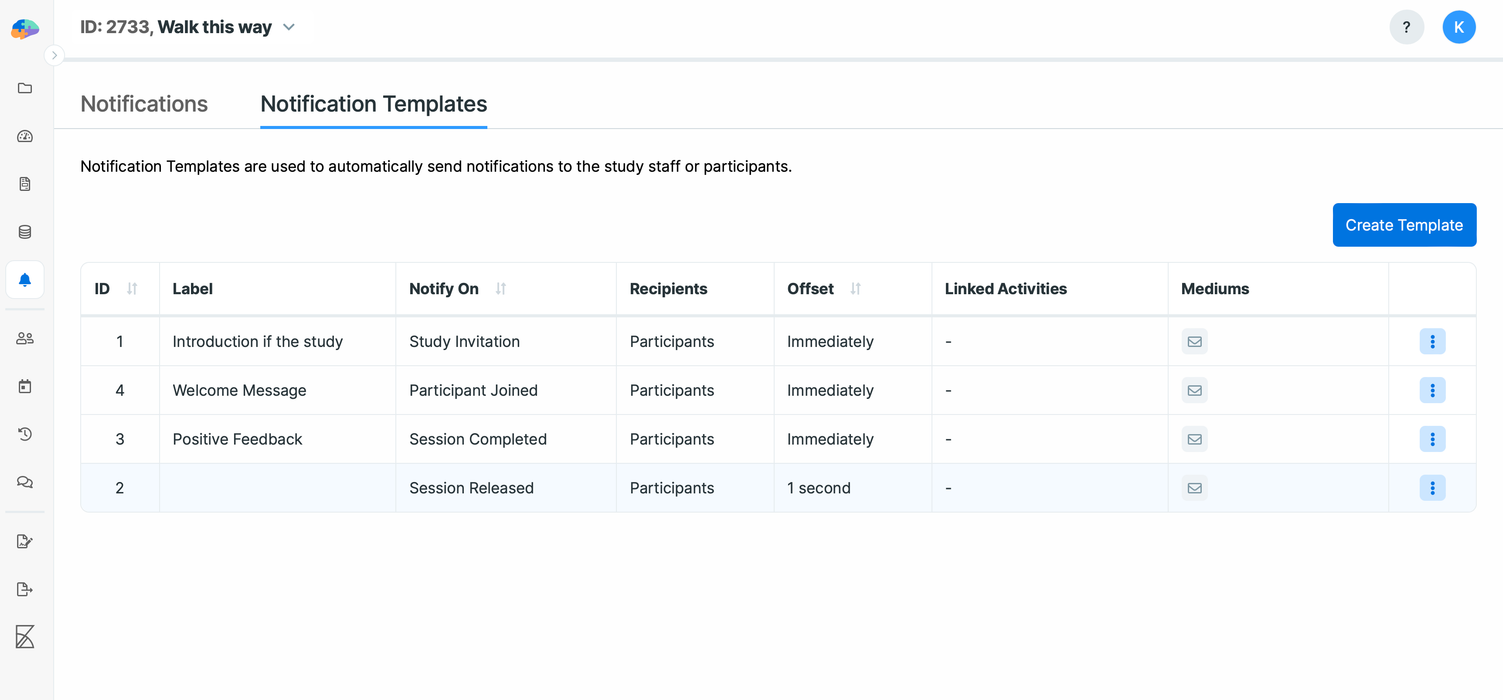
To edit a notification template in the Activity Editor:
- Go to the Activities page, choose an activity, open the Activity Editor, and then go to the Notification Templates page.
- Click on the Edit button in the Actions column.
[!caution]
Keep in mind that you need to be careful when making changes to a notification template via the Activity Editor. Since a notification template might be linked to several activities within the same study, the modifications that you make to a linked template will affect the other activities as well. When you make changes to a linked template, the changes will be applied to all activities immediately.
Notifications Log
If you open the Notifications page on your researcher dashboard and click on the Notifications tab, you can see the list of all notifications Avicenna has sent to your study participant, and the list of notifications that are scheduled to be sent in the future, based on your notification template configurations. As you can see in the image below, for each notification, you can see:
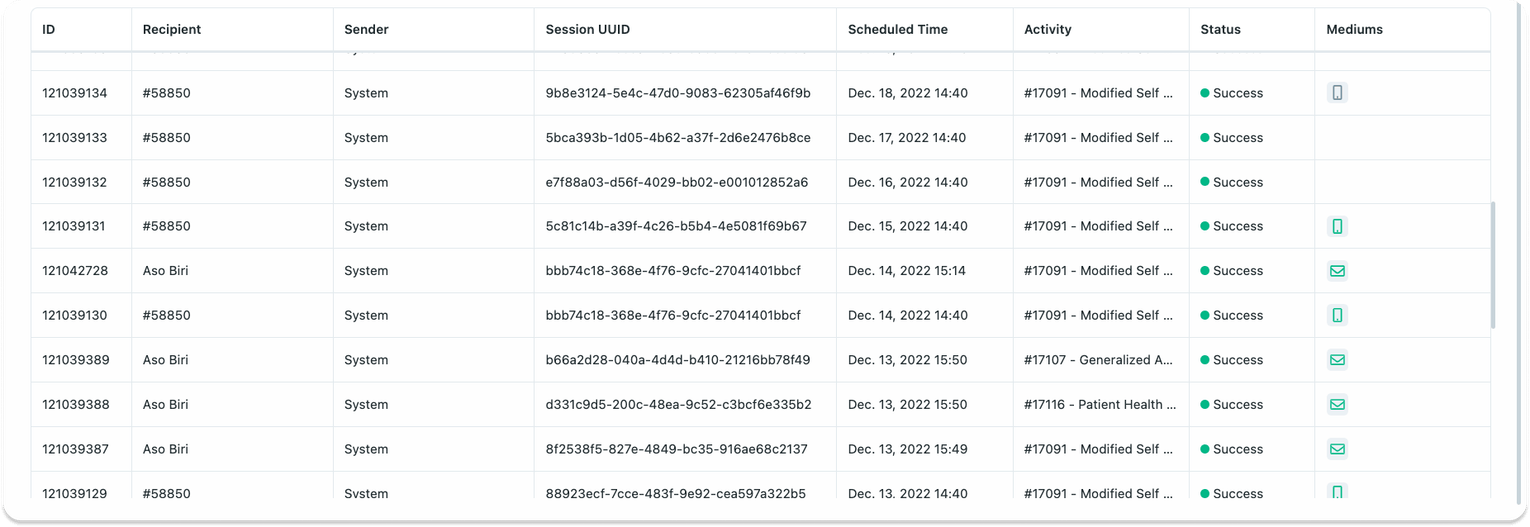
- The notification ID
- The intended recipient
- The notification sender (this will be Avicenna System in almost all cases)
- The unique identifier of the related activity session (session UUID)
- The scheduled time of the notification, which tells you when the notification was sent or will be sent
- The activity name that the notification belongs to
- The notification mediums that tell you through which medium a given notification is sent
- The notification status, which shows how far the notification progressed. See Step 3: Check the Notification Status for the full list of statuses and what to do about each one.
[!info]
It’s worth noting that when a session is blocked, expired, canceled, or completed, the associated upcoming Session Release notifications will be automatically deleted and will not be displayed. For further information on the session’s status, please refer to the Triggering Logics.
As an example, let’s say a researcher wants a participant to complete two sessions of one activity, one at 8 am and the other at 9 am. If the expiry time of the first session is set to 2 hours and the participant does not complete it before 9 am, the session scheduled for 9 am will be marked as “blocked,” and the associated upcoming Session Release notifications will not be triggered for that session.
In another example, A researcher has set up a notification template for a study. This notification template is designed to remind participants about a session 20 hours after it begins.
Imagine a participant starts one of these sessions. If they finish it quickly, say within 10 hours, Avicenna understands that this participant has already completed the session, so they don’t need a notification.
As a result, if a participant completes the session in less than the 20-hour reminder window, they won’t get the reminder notification.
One-Off Notifications
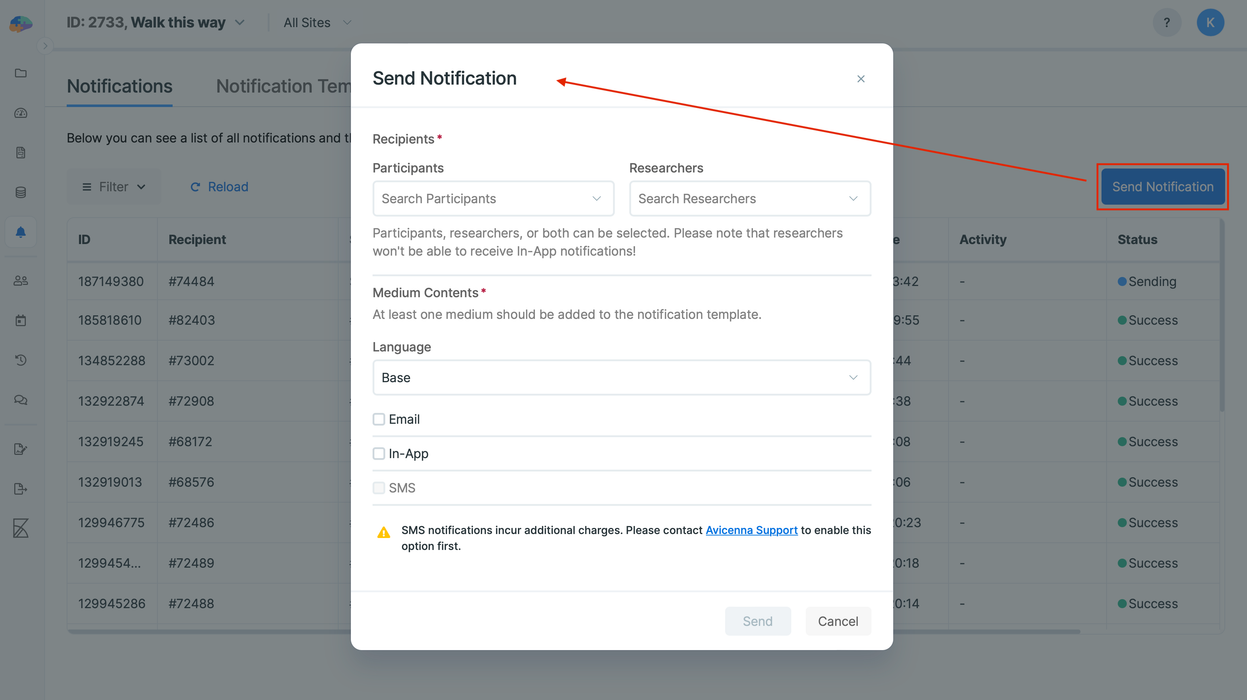
Avicenna allows you to send custom, one-off notifications to participants and other researchers of your study via In-App, Email, and SMS mediums. We refer to this as manually triggering a notification. Note that these notifications do not use a template. To create a one-off notification:
- On your researcher dashboard, click on the Notifications page, and then the Notifications tab.
- Click on the Send Notification button.
- Specify the recipients, the mediums, and the content for each medium. (If you have more than one language added to your study, you should specify the language field too.)
- Hit the Send button.
[!note]
Keep in mind that since the Avicenna app is only used for participants, you cannot use the in-app medium to send notifications to other researchers of the study.
Data Filtering
To filter your data, you can set conditions, sort, and select the columns to be shown for Notifications as necessary. If you want to learn more about this feature and how it works, please refer to the Data Filtering page.
Notification Settings in Avicenna
Avicenna offers various notification settings to ensure both researchers and participants stay informed. Here’s a breakdown of these settings:
For Participants
- Participants receive in-app notifications by default. Upon verifying their email addresses or phone numbers, they can add these additional notification methods. However, they retain the option to disable email and SMS notifications within the app.
- Avicenna ensures that the in-app notification setting remains always on, but participants can adjust their other preferences:
- Launch the Avicenna app.
- Navigate to
Settings. - Access
Notifications. - Under
Mediums, participants can specify their notification preferences.
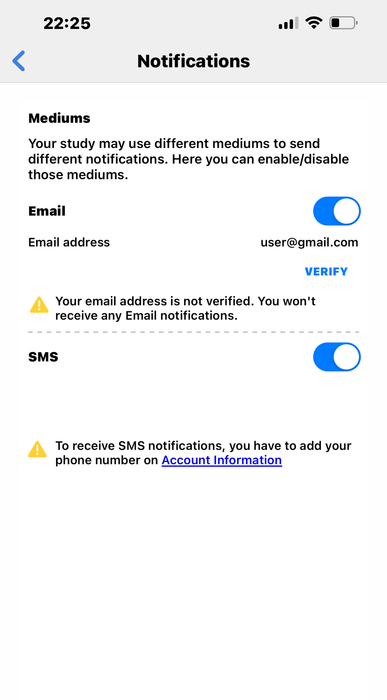
While participants can use the Notifications page to verify their email address and phone number, they can also use the study setup section of the app. When a study is set to ask participants for a verified email address and/or phone number, participants will need to go through the verification processes. Upon successful registration in your study, a message will appear on top of the study’s homepage (on the app) that reads Your study setup is incomplete. Participants need to click on Continue. Then, they will be presented with some actions to take for better compliance. For more details, you can check enrolling participants.
Whether participants are asked to verify anything at all is a study setting, not a participant setting. To change it, go to the Basics page, click Edit Study, and find the Participant Verification section, which asks whether Avicenna should validate each participant’s phone number and email. Two options are available, and both are off by default:
- Verify email: Participants must verify their email address before they can receive email notifications.
- Verify phone number: Participants must add and verify a phone number before they can receive SMS notifications.
When you turn either option on, already-enrolled participants see the Your study setup is incomplete banner on the study’s homepage in the app until they complete the verification. Turning on Verify phone number also asks participants’ devices to reload the study, so the request reaches them without waiting for the next scheduled reload.
[!note] Verify Phone Number Requires SMS
Verify phone number only takes effect if SMS notifications are enabled for your study, which Avicenna Support does on request. If SMS is not enabled for your study, this setting silently reverts to off when you save, without an error message.
If you create a notification template that uses the Email or SMS medium while your study does not require the matching verification, the dashboard points this out and offers to turn the requirement on for you.
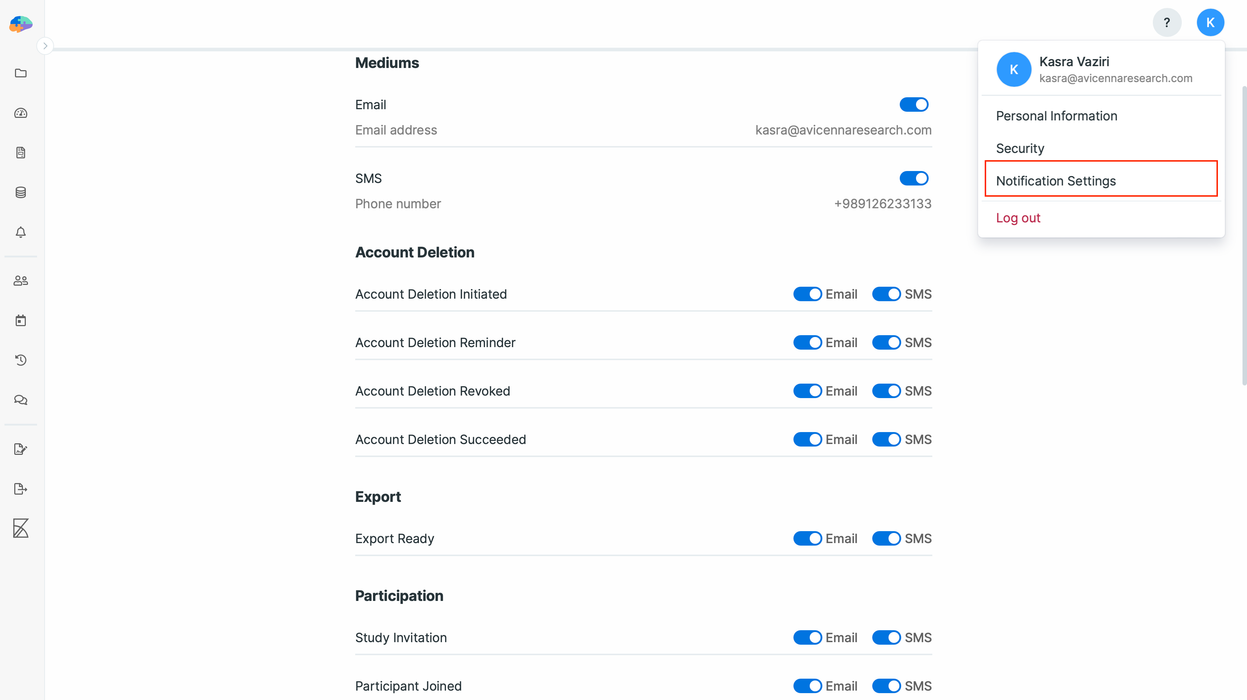
For Researchers
- Researchers have the flexibility to disable either the Email or SMS notification channels.
- As a researcher, you can choose which notifications you’d like to receive:
- Click on your avatar located on the top right.
- Select Notification Settings and change the settings.
Troubleshooting
Notifications Are Not Prompted or Sent
If participants do not receive notifications, receive them at the wrong time, or only receive them when they open the app, follow the steps below. Start by checking whether the notification was created, then check its status and finally the participant’s device.
A notification goes through six stages before a participant sees it:
| Stage | What happens | If it fails |
|---|---|---|
| 1 | A notification template exists and is linked to the activity | No notification is created |
| 2 | For activity notifications, the activity session is created | No notification is created |
| 3 | Avicenna creates and schedules the notification | No record appears on the Notifications page |
| 4 | At the scheduled time, Avicenna evaluates the criteria and selects the notification mediums | The notification has a status such as Invalid Criteria, Disabled, or Stale |
| 5 | Avicenna sends the notification through each selected medium | One or more mediums have a failed status |
| 6 | The participant’s device displays the notification | The notification appears successful in Avicenna, but the participant does not see it |
[!note]
Stages 1–5 happen on the Avicenna side and can be checked from the Researcher Dashboard. Stage 6 depends on the participant’s device and its settings.
Step 1: Check That the Notification Should Exist
Before troubleshooting delivery, make sure Avicenna was expected to create the notification.
- Check that a notification template exists for the intended event.
- For activity notifications, check that the template is linked to the activity.
- For session-based notifications, check that the activity session exists and that its status is not
False CriteriaorBlocked. If a session is missing, see One or More Sessions Are Missing and check the triggering logic. - Check the scheduled time against the participant’s participation period, not only the study’s participation period. See the Participation tab and Participation Period.
- Check the general steps to diagnose participation issues, including the app version, device time and timezone, and data synchronization.
[!warning] Participant-Triggered Activities
Activities started by participants through a User triggering logic do not generate session notifications. No notification is created or shown on the Notifications page. This is expected behavior.
[!note] Changes to an In-Progress Study
When you change a study or a participant’s participation period, Avicenna deletes and re-creates pending notifications for affected sessions. If a notification is missing from the Notifications page entirely, a recent study or participation change may be the reason. See Changes to an In-Progress Study.
Step 2: Check the Notifications Page
Open the Notifications page and filter the results by participant and time period.
- No record: The notification was not created. Go back to Step 1.
- A record exists: Check its status and the notification mediums, then continue to Step 3.
Step 3: Check the Notification Status
The notification status shows how far the notification progressed.
| Status | Description | Action |
|---|---|---|
Pending |
The notification is scheduled but not yet due | No action is needed if the scheduled time is still in the future |
Sending |
Processing has started | Wait briefly and check again. In-app notifications can stay in this state, so check the medium status in Step 4 |
Success |
All selected mediums were sent successfully | Continue to Step 4 |
Partially Failed |
At least one medium was sent and another failed | Continue to Step 4 to identify the failed medium |
Failed |
All mediums failed or notification processing failed | Contact support with the notification ID |
Invalid Criteria |
The notification criteria evaluated to False when the notification was due | Review the template criteria and the participant’s data at that time |
Disabled |
No eligible medium was available, or sending was disabled on the server | Check the participant’s notification mediums |
Stale |
More than one hour passed between the scheduled time and the sending attempt | Contact support with the notification ID |
None |
The notification has no known status | Contact support with the notification ID |
[!warning] Disabled Notifications
ADisabledstatus usually means that none of the notification mediums configured in the template are enabled for the participant.For example, if a template uses Email but the participant has only In-App notifications enabled, the notification is marked
Disabled. Check the participant’s Notification Settings and the mediums configured in the notification template.
Step 4: Check the Medium Status
A notification can use multiple mediums, and each medium has its own status.
| Medium status | Applies to | Description |
|---|---|---|
Sending |
All | The notification has been handed over for processing |
Unknown |
All | The medium has no known state, which Avicenna treats as a failure |
Success |
All | The notification was accepted for delivery. For Email and SMS this is the last status Avicenna sees. For In-App, a further status follows once the device handles the notification |
Failed |
All | The notification was rejected |
Scheduled by Avicenna |
In-App | The app received and stored the notification but has not handed it to the operating system |
Scheduled by OS |
In-App | The app handed the notification to the operating system |
Prompted |
In-App | The notification was displayed on the participant’s device |
Tapped |
In-App | The participant opened the notification |
Dismissed |
In-App, Android | The participant dismissed the notification |
Blocked |
In-App | The notification was suppressed because the associated session was blocked |
Invalid Criteria |
All | The notification was not sent because its criteria evaluated to False |
If an in-app notification is Scheduled by OS, Avicenna has handed it to the device and the remaining issue is likely related to device settings.
If it is Scheduled by Avicenna, the app has received the notification but has not handed it to the operating system. This can happen when the app is not running reliably in the background or is offline.
Step 5: Troubleshoot Email and SMS Notifications
- Check that the participant’s email address or phone number is verified and that the participant has enabled the corresponding notification medium.
- For email notifications, check the troubleshooting steps under I Didn’t Receive the Verification Email.
- Check the Application State logs on Kibana if the participant is using the mobile app.
- If the participant’s phone number has disappeared from their profile, an SMS sent to that number may have been rejected as invalid. Ask the participant to enter and verify the number again.
- If the participant replied
STOPto an Avicenna SMS or blocked the number on their phone, SMS notifications are removed from their enabled mediums. The participant needs to re-enable SMS underSettings > Notifications.
Step 6: Troubleshoot In-App Notifications
If the notification status shows that the notification was successfully delivered to the device, check the participant’s device settings.
- Make sure
Do Not DisturborFocusis disabled, or that Avicenna is allowed to send notifications while it is enabled. You can confirm this in the Device State logs on Kibana. - Check that Avicenna has permission to send notifications.
- Make sure the study setup is complete. If the pink
Your study setup is incompletebanner is still shown in the app, ask the participant to complete the required setup steps. - Ask the participant to review their settings using Participant App Settings.
- If necessary, ask the participant to follow Keep the App Running, which covers device settings that can affect notifications and background data collection.
Android App
- Make sure
Survey Notificationsis enabled in the Avicenna app. - Go to
Settings > Apps > Avicenna > Notificationsand make sureSurvey-related notificationsandStudy-related notificationsare enabled. - Make sure
Alarms & Remindersis allowed for Avicenna. - Disable battery optimization for Avicenna. See Background Data Collection.
- Check the device-specific battery optimization settings. See Android Battery Optimization Workarounds.
- Make sure the device allows Avicenna to run reliably in the background. See Android Background Permission Workarounds.
- If the issue persists, check Don’t Kill My App for device-specific recommendations.
[!warning]
Some Android manufacturers apply additional battery and background restrictions that can prevent notifications from being delivered reliably. These restrictions are outside Avicenna’s control.If the study protocol allows it, consider enabling additional notification mediums such as Email or SMS to reduce the chance of a missed notification.
iOS App
- Go to
Settings > Notifications > Avicennaand make sure notifications are enabled. - Set the banner style to
Persistent. - Set
Show PreviewstoAlwaysso notifications can appear when the device is locked. - Make sure
Low Power Modeis disabled. - Make sure
Background App Refreshis enabled for Avicenna.
Notifications From Avicenna Don’t Vibrate or Make a Sound
This is usually related to the participant’s device notification settings.
- Turn off
Do Not DisturborFocus Mode, or allow Avicenna through it. - Check the app-specific notification settings.
Android
- Go to
Settings > Apps > Avicenna > Notifications. - Make sure sound and vibration are enabled.
- Make sure
Survey-related notificationsandStudy-related notificationsare configured as alerting notifications.
iOS
- Go to
Settings > Notifications > Avicenna. - Make sure
Soundsare enabled. - Make sure the notification style is set to
BannersorAlerts.
- Check device-specific settings. Some Android manufacturers have additional battery optimization and notification settings that can affect how notifications are displayed.
Notifications Stopped for One Participant
If notifications stop for one participant while other participants continue to receive them, the issue is usually specific to that participant or their device.
Check the following:
| Check | Where to check |
|---|---|
| The participant’s phone number was cleared after a failed SMS, or the participant blocked the Avicenna number | Participant profile and Step 5 |
| The participant’s enabled mediums do not overlap with the template’s mediums | Notification Settings and the Disabled status in Step 3 |
| The participant’s participation period has ended | Participation tab |
| The app was force-closed, uninstalled, or the participant changed phones | Keep the App Running and General Steps to Diagnose Participation Issues |
| A phone update changed permissions, or Android removed permissions for an unused app | Android Background Permission Workarounds |
If several participants in the same study are affected at the same time, treat the issue as a study-level problem and start again from Step 1.