When an activity is prompted to a participant, Avicenna creates a Session for it. This session stores information about the prompted activity, any responses provided by the participant or the researchers, and other related metadata.
View and Manage Activity Sessions
To view an overview of the sessions in your study, follow these steps:
- Open the Activity Sessions page in the Researcher Dashboard.
- Go to the Participants tab from the right-side panel and select the participants whose sessions you want to check. Currently, you can choose a maximum of five participants.
- Then go to the Activities tab and select your desired activities.
- Press Apply Filters.
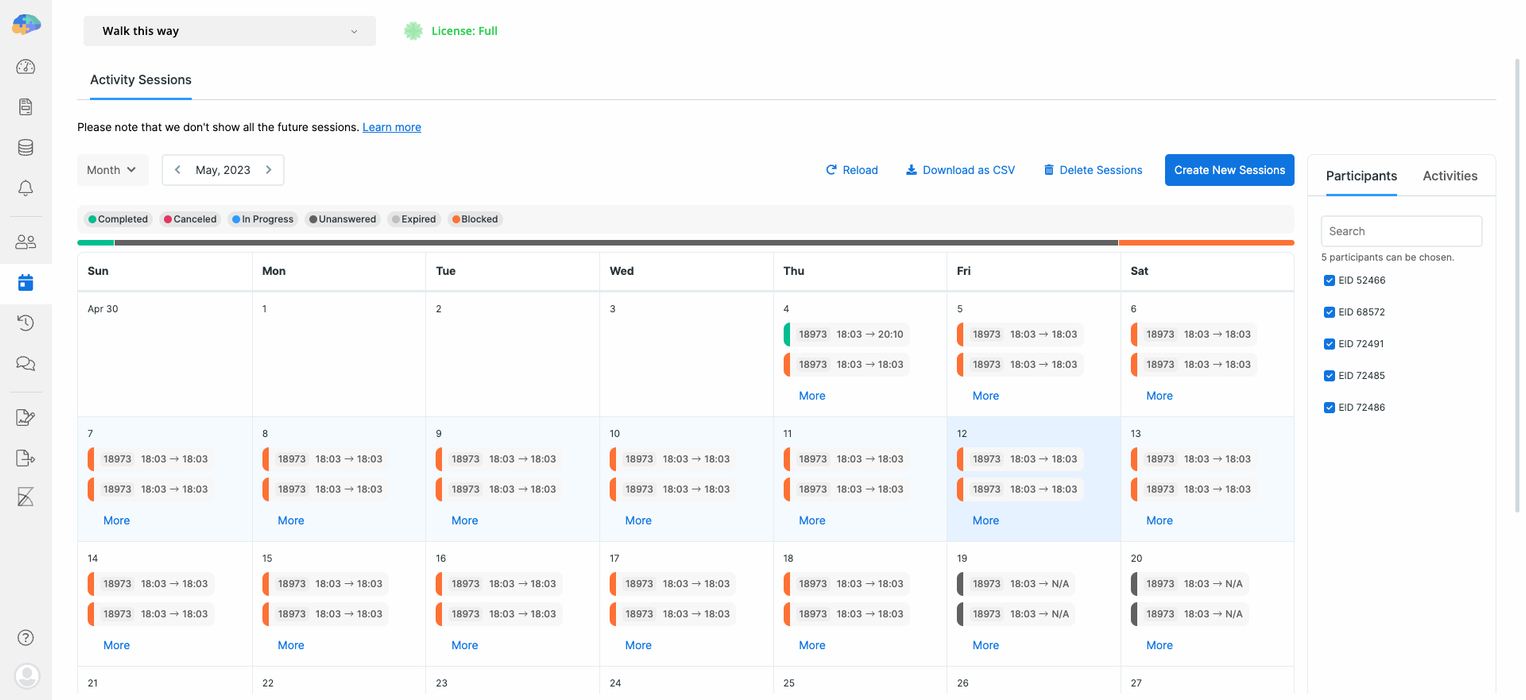
After applying your filters, you can view all activity sessions and their status for the selected participants.
Filter Activity Sessions
You can view activity sessions starting from when a participant joins your study. To do this, select a participant ID under the Participants tab and click the Go to Join Time button. This feature is useful for verifying that all study sessions are created correctly for each participant.
In the top-left corner, you can specify the period that you want the sessions to be displayed in. You can select a Daily, Weekly, Monthly, or Yearly view. Also, below the session statuses, you can find a progress bar. Hovering over it displays a tooltip showing the number and percentage of sessions for each status. For example, the image below shows that we have 245 Unanswered sessions for the selected participants, accounting for more than 82% of all sessions.
You can also filter sessions by status by clicking the status badges above the calendar. By default, the False Criteria status is unselected.

Session Statuses
Each session has a status, which can be one of the following:
- Unanswered/Unknown (ID 0): No response has been registered or uploaded for this session yet. This does not necessarily mean the session has not been initiated; it may have been prompted, but the response has not been recorded.
- Completed (ID 1): The participant completed and submitted the session.
- Canceled (ID 2): The participant chose not to complete the session and explicitly canceled it.
- Expired (ID 3): The participant did not respond in time, so Avicenna automatically marked it as expired.
- Blocked (ID 4): The session could not be prompted because it was blocked by another active session from the same activity. See Blocked Sessions.
- In Progress (ID 6): The participant started the session, but it has not yet been completed, canceled, or expired.
- False Criteria (ID 5): The session was not prompted because the criteria for either the triggering logic or the activity itself evaluated as
False.
Concluded Sessions
In Avicenna, we consider an activity session “concluded” when its status is one of the following:
- Completed
- Expired
- Canceled
- Blocked
[!note]
The status updates might not appear immediately. The Avicenna server waits for the participant apps to explicitly send the status updates as part of the updates on the corresponding sessions. As a result, you might see some sessions that should be marked as, for example,Expired(because their expiry time has passed), but are not updated yet.
[!info]
Once a session is canceled, expired, blocked, or completed, the corresponding upcoming Session Release Notifications will not be sent.
Expired Sessions and Expiry Time
Each Activity can have an Expiry Time, which specifies how long after the scheduled time Avicenna should wait for the participant to complete the activity and submit it. If a participant fails to submit their response within the set timeframe, the session will automatically close and be labeled as Expired.
[!note]
ForExpiredsessions, any data collected up to the time of expiration will be uploaded to the Avicenna servers.
Why setting an Expiry Time is critical:
Setting an Expiry Time acts as an automatic cleanup mechanism for your activity timeline. Its primary purpose is to cleanly close an ignored or incomplete session so that it does not remain active indefinitely. If you leave the Expiry Time set to Never on a recurring or daily schedule, old uncompleted sessions will stay active on the participant’s device indefinitely. This will directly cause any subsequent scheduled sessions to be labeled as Blocked, which will cause participants to miss future activities entirely. Read more about blocked sessions below.
Blocked Sessions
Each activity can only have one session running at a time; sessions cannot overlap. If a new session is triggered while another session for the same activity is still active, the new session will immediately be closed and labeled as Blocked, and no response will be available for these sessions.
[!example] Example 1: Daily Repeating Schedules with No Expiry
Suppose an activity is scheduled with a Time Trigger Logic to repeat daily at 9:00 AM, but the Expiry Time is left set to Never.
- Monday at 9:00 AM: Monday’s session triggers and sits on the participant’s device. The participant forgets to take it.
- Tuesday at 9:00 AM: Tuesday’s session tries to trigger. Because Monday’s session has no expiry time, it remains active indefinitely on the device. Since two sessions cannot overlap, Tuesday’s session is immediately Blocked and skipped entirely. This blocking loop will continue every subsequent day (Wednesday, Thursday, etc.) until Monday’s session is either manually submitted or canceled by the participant.
[!example] Example 2: Hourly Overlap
Suppose an activity is scheduled with a Time Trigger Logic for 8:00 AM and 9:00 AM, with an expiry time of 2 hours.
- At 8:00 AM, Avicenna prompts the participant, starting a new session.
- By 9:00 AM, if the participant hasn’t responded or cancelled the 8:00 AM session, the 9:00 AM session cannot start. Avicenna will mark the 9:00 AM session as
Blocked.
![]() Best Practice: To prevent older sessions from blocking newer ones, always set an expiry time for your activity that is shorter than the interval between your scheduled sessions (e.g., for a daily survey, set an expiry time of 23 hours or less so the old session clears out before the next day’s session arrives).
Best Practice: To prevent older sessions from blocking newer ones, always set an expiry time for your activity that is shorter than the interval between your scheduled sessions (e.g., for a daily survey, set an expiry time of 23 hours or less so the old session clears out before the next day’s session arrives).
Sessions Metadata
Each session on the calendar shows three key pieces of information (metadata):
- Activity ID
- Scheduled time (time only, without the date)
- Response time (time only, without the date)
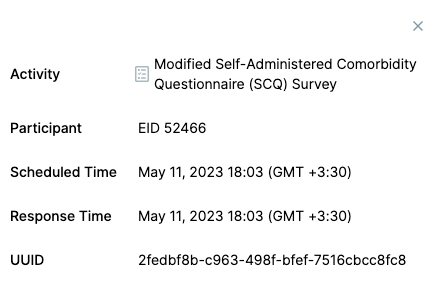
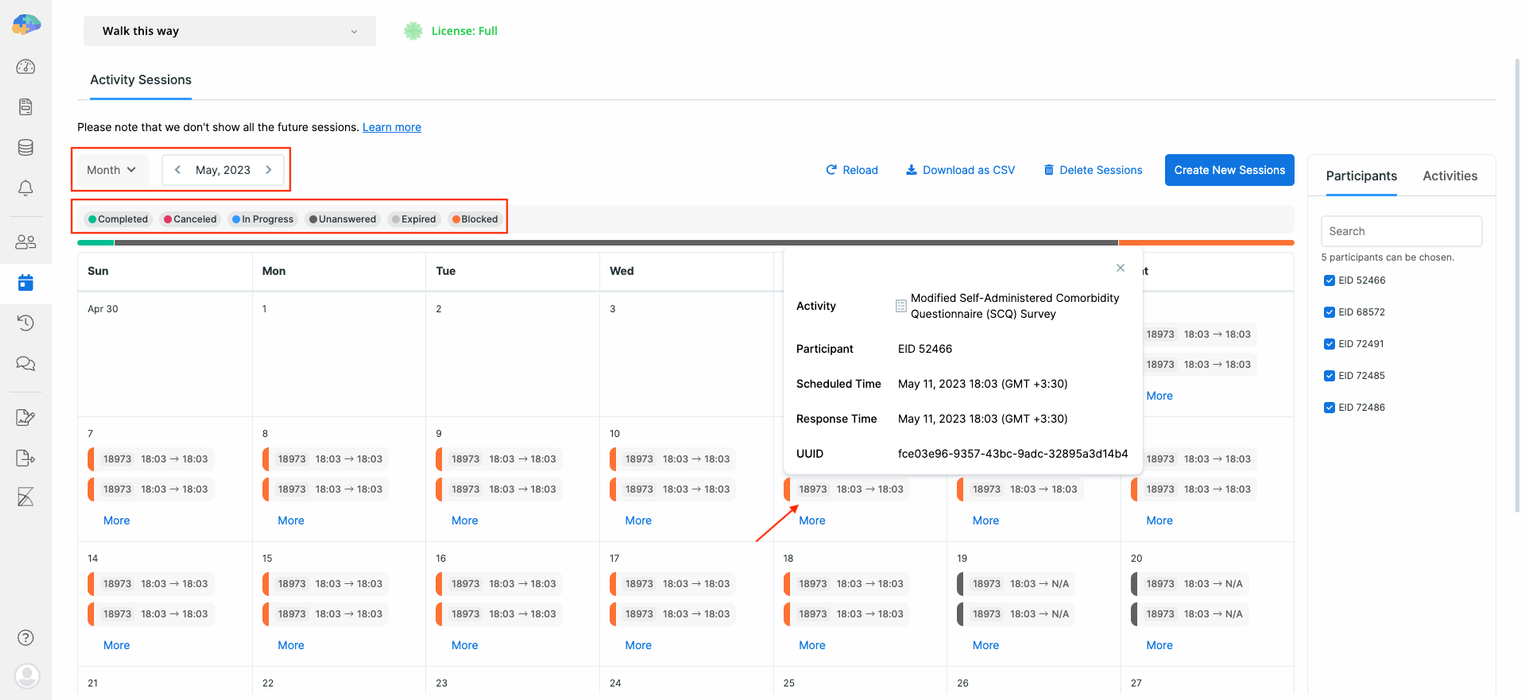
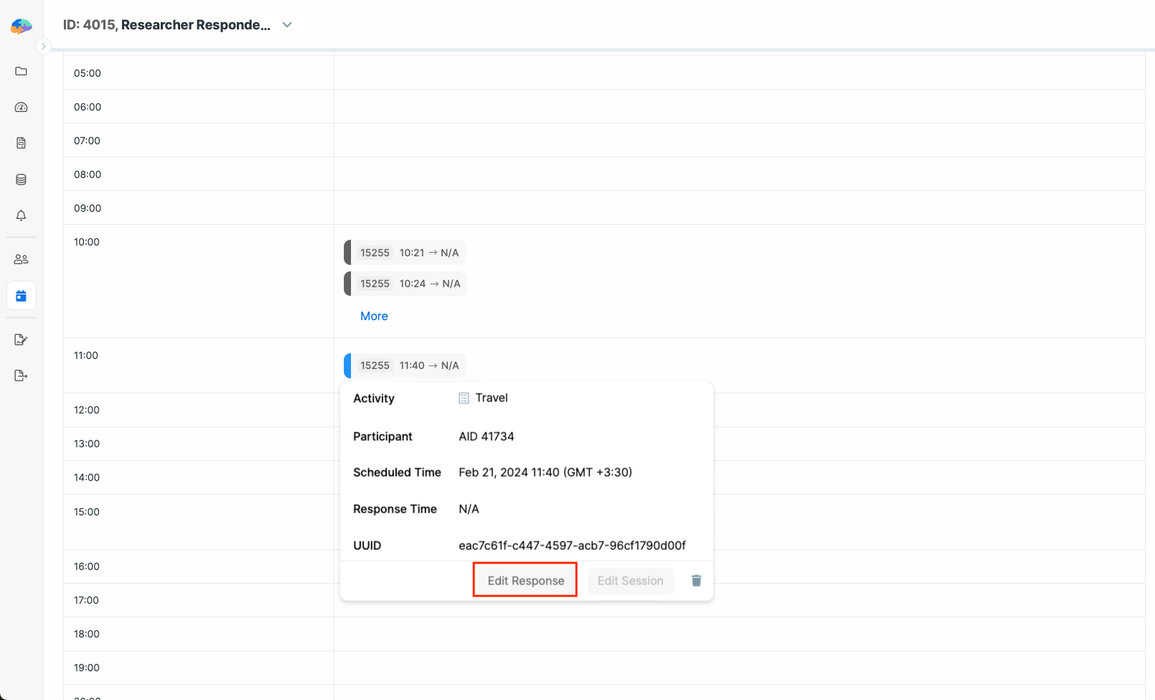
Clicking on a session provides additional metadata, including:
- Activity: Name of the activity.
- Participant: Participant associated with the session.
- Scheduled Time: The date and time the activity was scheduled. For sessions that are prompted via Triggering Logics types other than Time TL, this is set to the time the Avicenna app starts the session.
- Response Time: The date and time when the session was concluded and queued for upload to the Avicenna server.
- UUID: Universal Unique Identifier, which uniquely identifies the session in Avicenna.
[!info] N/A Values
Sometimes,Response Timevalues are shown as “N/A”. ForFalse Criteriasessions, this is expected. However, it can also indicate that the session has not yet concluded from the server’s perspective. This is because Avicenna mobile apps can work offline, too. Even when a session has an expiration time known to the server, the server cannot be certain whether the session has expired, completed, canceled, or blocked until the participant app sends the status update.
[!info]
Whether you are using Avicenna as a researcher or a participant, all time values are automatically converted to your local time zone. Sessions are displayed based on the user’s local time. For more details on how Avicenna handles time, see Participation Period.
[!example]
Viewing Sessions for a Participant
Suppose you want to view all sessions that were or will be prompted for a participant in your study (Participant ID: 59982) during March 2023:
- In the right-side panel, select the Participant and Activities you want to include.
- Click Apply Filters.
- Set the view to Month and select March 2023 as the date range.
The calendar will now display all sessions scheduled for this participant in March 2023 along with their statuses.
Note: If there are more than two sessions in a cell, you will see a
Morebutton, which, if clicked on, will show you the list of all sessions in that particular time slot cell.
Actions on the Activity Sessions
On the Activity Sessions page, you can manage sessions in several ways, including creating, editing, and deleting sessions, as well as editing participant responses (as a researcher).
Create a Session
Avicenna offers two ways to create a session:
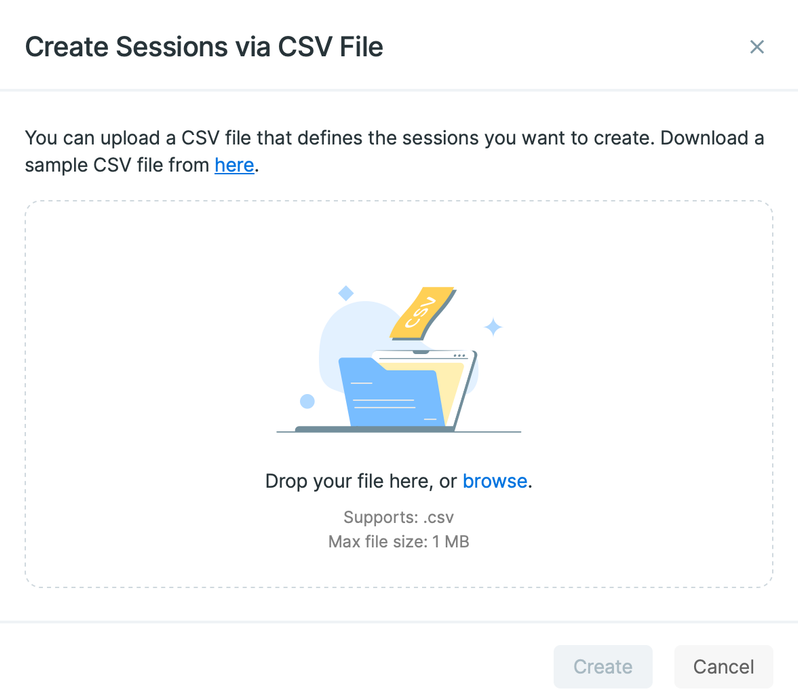
1. Using a CSV File
-
Click the Create New Sessions button above the calendar and select Create via CSV File.
-
Optionally, download the sample CSV file provided in the dialog.
-
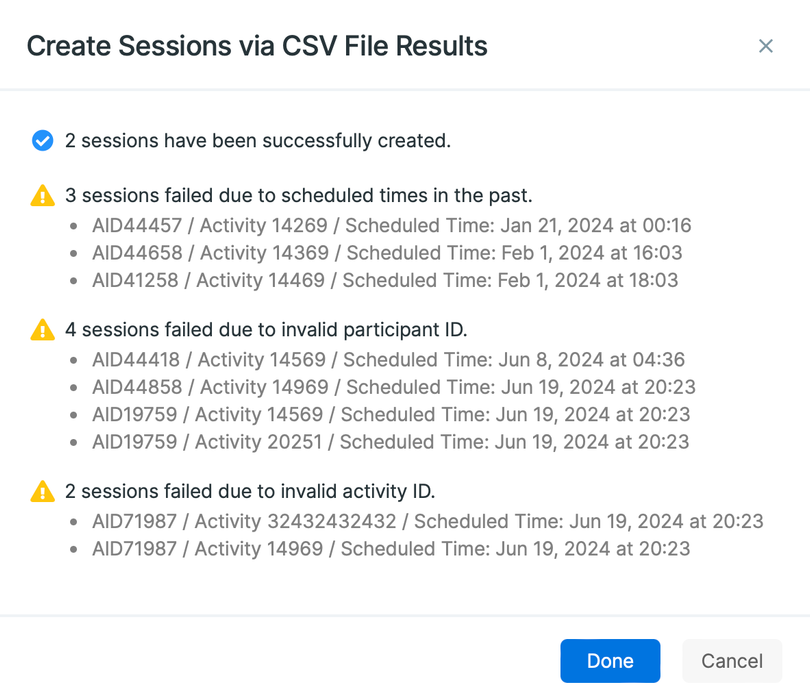
Upload a CSV file containing Participant ID, Activity ID, Scheduled Time, and optionally Expiry Time. Example:
user_id,activity_id,scheduled_time,expiry_time
19759,14569,2025-03-05 00:00:00,
71987,20251,2025-03-06 00:00:00,2025-03-06 00:00:00
You can either drag and drop your file or select it from your device. After uploading, a dialog will display which sessions were successfully created and identify any that encountered issues.
After the sessions are created, the mobile devices for the corresponding participants will reload automatically.
[!info]
Currently,scheduled_timeandexpiry_timevalues are stored in UTC; the participant’s timezone is not considered.[!info]
You can drop the wholeexpiry_timecolumn or leave the corresponding cell empty for some rows. In the latter case, the expiry time will be calculated based on the activity’s Expiry Time.
2. Using the Calendar
-
Click on any empty cell in the calendar for upcoming days.
-
In the Create Session dialog, specify Activity, Participant, Scheduled Time, and Expiry Time.
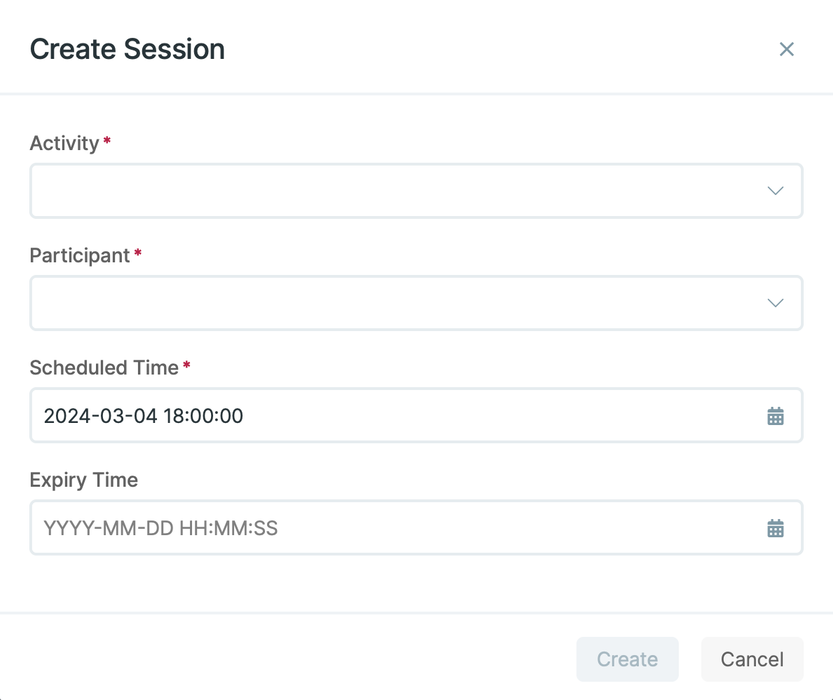
[!info]
When creating a session using the Create Session dialog, only the participants selected from the right-side panel will appear in the Participant field, and you can create sessions for one participant at a time.
In contrast, the CSV upload option allows you to create multiple sessions for multiple participants and activities at once.
[!note]
Session that you create this way or using a CSV file will be a Researcher-Defined Session.
Release an Activity
Sometimes you may want to prompt an activity immediately for one or more participants. Avicenna allows you to manually trigger an activity at any time. For more details, see Manually Triggering an Activity.
Delete a Session
You can delete a session in two ways:
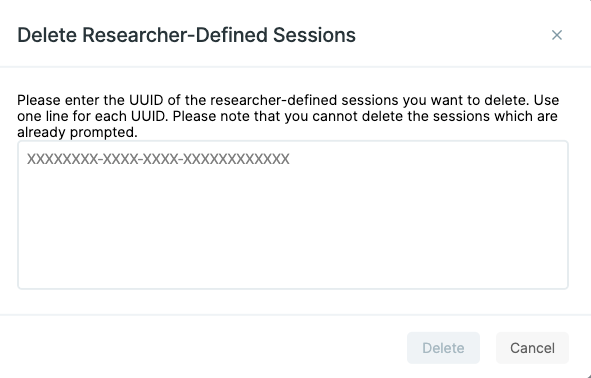
1. Using the Delete Sessions Tool
Click the Delete Sessions button above the calendar and enter the UUID of the sessions you want to delete.
-
Only researcher-defined sessions can be deleted using this method.
-
Only future sessions are eligible for deletion.
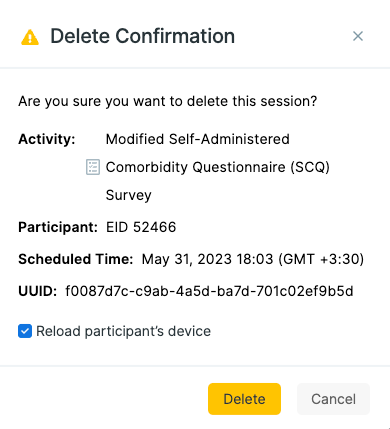
2. Deleting from the Calendar
Click on any session, whether in the future or the past, and tap the Delete icon. A confirmation dialog will appear; confirm to delete the session.
-
This method allows you to delete all session types, including time TL and researcher-defined sessions.
-
Avicenna will automatically reload the corresponding participant devices after deletion.
Edit a Session
You can edit sessions, only future sessions, directly from the Activity Sessions page. To edit a session:
- Click on an upcoming session in the calendar.
- Then tap the Edit icon.
- You can change the Scheduled Time and Expiry Time in the opened dialog.
- By default, the participant’s device will reload to ensure the changes are applied.
For researcher-defined sessions, like deleting a session, the Reload participant’s device option is not shown, as Avicenna automatically updates these sessions.
[!note]
TheEdit Sessionoption is disabled for researcher-responded sessions. Because these sessions are scheduled to occur immediately (“now”), their scheduled time is considered to have already passed as soon as they are created. As a result, they cannot be edited once started.
Edit Responses
Available for surveys only, excluding Eligibility and Dropout surveys
As a researcher, you may need to edit the responses of the participants. To do this, follow these steps:
-
Go to the Activity Sessions page.
-
Click on the session you want to edit.
-
Click Edit Response to open the response editor.
Some types of questions allow you to clear the current answer by clicking on the Clear button rather than doing it manually. These include:
You can also:
-
View the response history for each of the questions by clicking on the 3-dots menu and clicking on
View Response History. For more details, see Viewing Survey Response History. -
View the comments on any response or add your own. To do this, click on the 3-dots menu and then click on
View Response Comments. For more details, see Commenting on Survey Responses.
[!info]
Editing the sessions other than the researcher-responded sessions will reload participants’ devices.
However, if editing a researcher-responded session changes the criteria or survey question content placeholders of another session, the participants’ devices will be reloaded.
[!note]
When you’re editing the responses as a researcher, the session won’t expire even if the survey has an expiry time.
Save a Session
After modifying the answers, you can click Save or Submit at the top-right corner of the page.
- Save: Stores your changes and sets the session status to
In Progress. - If the response to a question is invalid based on the question properties (e.g., format, min, max), you won’t be able to save your response, and an alert message will notify you.
Submit a Session
- Submit: Saves the session and sets its status to
Completed. - The Response Time is recorded only the first time the session is submitted.
- Similar to saving, submission will be blocked if any responses are invalid according to the question properties.
Download Sessions
On the Activity Sessions page, you can download all sessions defined in your study as a CSV file. To do this, click the Download as CSV button above the calendar. The downloaded file includes key session information such as Participant ID, Activity ID, Scheduled Time, Record Time, Status, and more.
Troubleshooting
One or more sessions are missing
If you notice that some sessions are missing from the Activity Sessions page or the downloaded CSV file, you can follow these steps to diagnose and fix the issue:
- Check the general steps to diagnose participation issues.
- Check the corresponding triggering logic of the activity to see if it’s there and if yes, its configurations are as you expect.
- Check if the expected scheduled time is within the participation period of the corresponding participant.
- Check if the corresponding activity’s or triggering logic’s criteria, if any, was False for the corresponding participant at the time the session was supposed to be scheduled for. You can check this on the Activity Sessions page by enabling the
False Criteriastatus. - Check if the session is manually deleted (either by a researcher or the system somehow). You can do this by finding the “TUD Session Rescheduled or Deleted”, “TUD Session Deleted”, and “Time Session Rescheduled or Deleted” audit logs for the corresponding participant.
- If the session was supposed to be created by the participant (e.g., based on a User triggering logic), check if the participant was online and synced their sessions and responses with the server since then. You can do this by finding any audit log for the corresponding participant.